Monday, January 10, 2022

How to Root Muscadine Grape Vine Cuttings

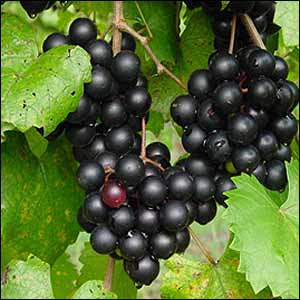
Beautiful Muscadine Grapes

I have been growing grapes for almost fifteen years from cuttings I found while walking through my neighborhood. There was an old dilapidated house that was slowly sinking into the creek, but this house had a short fence with grape vines rambling over and around the old metal bars. One day in late October, as I walked my normal route, I realized that a neighbor had done a lot of pruning to the old vine and left the cuttings to dry up and rot away. Somewhere in the back of my brain, I remembered that grape vines could be encouraged to root and then sprout back into life. I took my treasure home and  found a spot in my yard to "plant" them in a trench about 6 inches deep. From the fruit I had seen during the summer, I thought they were Concord grapes, and figured they couldn't be that hard to grow.

Well, here it is now over a decade later and every year we get a nice harvest from the nine vines that grew from those cuttings. Almost nothing bothers the vines or the fruit except for a few rascally beavers that every few years will come along and bite through the nice thick base of the vine only to find that nothing falls down and he resorts to eating the lower portion of the vine down to the ground. As aggravating as it is, I know I can take cuttings from the leftover suspended vines on the trellis and that the roots will push out a new vine in the spring.

Inside the Muscadine grape vines


My muscadine grape vines were a little more pampered. I bought them as rooted plants from a fancy nursery store and then planted them at the end of my yard. They were slow to get started but mostly because the soil was really poor and although I added a few inches of mulch over their base, the root zone was compacted.


They now grow a mile a minute during the growing season. Their black fruits are somewhat similar to a Concord grape in that they have a tougher outer skin that is quite tart. but the inside is very sweet.

Muscadine Grape Vine Cuttings


So just how do I root the cuttings from my muscadine vines? (Note that these are non-patented vines) Well, I have two methods:

Fall and winter planting of dormant vine cuttings:

Note: I think (but I have not found sound research to prove this) the muscadine vines need a cold stratification time after they lose their leaves in the fall so if you are collecting cuttings in the early fall months, I recommend at least 48 hours in the freezer before taking the following steps. Otherwise, cuttings collected in the winter have already gone through natural stratification and are ready to start rooting

  • prepare a rooting soil mixture of 50:50 vermiculite and sand or something similar
  • poke holes in the soil mixture about the depth of two thirds of the length of the cuttings
  • soak the cuttings in hot water (around 120 degrees F) for about 10 minutes
  • remove them from the water, blot off excess moisture and dip in rooting hormone
  • place the hormone covered end into the prepared holes 
  • press the soil mixture firmly around the base of the cutting
  • cover the rooting container loosely to hold in moisture.
  • place the container on a heat mat held at about 80 degrees F. in a shaded area
  • watch the cuttings for about 5-8 weeks making sure to keep the soil damp but not wet
  • once you see a callus form around the base of the cuttings, transplant the cutting into another container with regular potting soil and keep moist and still on the warming mat
  • check the cuttings carefully over the next couple of weeks to watch for the buds to swell. When you see signs of life, move them off the warming mat and under lights to encourage upper growth. 
Basically, you now have a tender young grapevine. You can start to harden it off by bringing it outside for a few hours at a time - if the ground is 60 degrees F or warmer. Don't try to plant it outdoors in the late fall or the cold stress might kill it.


Summer Rooting:
This is a much easier time to encourage muscadine grape vine cuttings to root.
  • take a basal cutting of the current year's growth that is a little thinner than a pencil.
  • remove all the leaves except for the top leaf and cut that in half. 
  • prepare your dampened rooting mixture of 50:50 vermiculite and coconut coir
  • poke holes in the soil mixture about the depth of two thirds of the length of the cuttings
  • dip the end of your cutting in rooting hormone 
  • place the angled end into the prepared holes and press the soil mixture firmly around the base of the cutting
  • cover the rooting container loosely to hold in moisture.
  • set aside in a warm and shaded area for 6 to 8 weeks. You should see plenty of root and maybe  leaf growth by the end of this time.
  • remove the covering when you see leaves budding out and keep the soil damp
  • plant into regular potting/garden soil after the leaves open
If you don't have access to a muscadine grape vine, I do sell cuttings from my plants during the year on Etsy here, WildflowerRun.

Wednesday, January 5, 2022

How to Root Hardy Kiwi (Actinidia arguta) Cuttings

I think there are lots of people that are like myself that want to start their own plants from a cutting. There is something intriguing about taking a dormant stick and watching life spring from under the seemingly dead bark. On the same hand, I have found such disappointment from watching a potentially alive stick do nothing more than rot away gradually before my eyes. Slowly, I am learning how to perfect the rooting process for better success rates.


Although the hardy kiwi is becoming more popular in nurseries, I think the vine is still a newcomer to most gardens, at least in the Mid Atlantic states around me. 

The vines take several years to fruit - mine took almost ten years before we actually saw fruit, but a couple of those years, we saw early blossoms only to have a late frost that killed off any coming fruit, so we might have had fruit earlier.


One of the coolest things about rooting a cutting is that the plant takes on the age of the mother plant, so even though you might start rooting some cuttings, you won't have to wait seven to ten years to get fruit, rather two or three years or just until the plant is established enough to bear fruit.


Why would you want to grow hardy kiwis?
  • they are delicious right off the vine - no peeling required
  • the plants are pest proof
  • the vine is a beautiful landscape plant
  • the hardy kiwi vine grows fast!
  • the hardy kiwi is still a unique plant
  • the kiwi berries are very nutritious and rarely found in grocery stores
  • the plant is very hardy and takes abuse 


So just how do you root hardy kiwi cuttings?

  1. Prepare a 50:50 mix of vermiculite and sand and dampen with water
  2. Fill plant pots or a deep tray with at least 6 inches of the prepared rooting mixture and press to flatten (I like translucent containers so I can see the root growth)
  3. Use the end of a pencil to poke holes about an inch shorter than the cutting
  4. Dip the freshly cut end of the cutting in rooting hormone
  5. Place the cutting in the hole
  6. Press the soil mixture firmly around each of the cuttings
  7. Cover the container to hold in moisture
  8. Place in a shaded area that stays warm (68-75 degrees F)
  9. Check the cuttings every week and mist if the soil mixture seems dry to the touch
  10. Wait and wait and wait some more.
Cuttings take time to root and hardy kiwis take at least two months if not longer. However, once you notice that the roots are started, the wait is forgotten and the excitement of a new plant takes over.

You can plant the cutting in a prepared garden bed or a plant pot. Think of growing hardy kiwis as you would a grape vine, but a grape vine on steriods. 
You will need -
  •  a spot with full sun (8+ hours a day)
  •  soil with good organic matter and freely draining
  •  a strong six-eight foot trellis that will hold the vines off the ground.

If you are interested in starting your own cuttings and don't have a local source, you can check out my Etsy page here: Kiwi Berry Cuttings


References:
http://citeseerx.ist.psu.edu/viewdoc/download?doi=10.1.1.1039.2464&rep=rep1&type=pdf,
https://ssl.acesag.auburn.edu/department/peaches/kiwiprop.html

Monday, January 3, 2022

Planting Jerusalem Artichokes (Sunchokes)

I had my first taste of sunchokes as a child living in California - a long time ago, Since then, I didn't see sunchokes or Jerusalem artichokes as I knew them, until a couple of years ago when we were shopping in a large Korean grocery market. I looked at my husband, Eric and excitedly showed him the package of three or four tubers on a Styrofoam tray wrapped in cellophane, fully expecting him to reciprocate my enthusiasm but instantly seeing his doubt. After I briefly explained my experience, he agreed that we should at least try them, so we brought them home. 


That was the beginning of the explosion of sunchokes all over our property! I planted the three or four tubers along our driveway envisioning three or four flower plants gracing our yard with tubers for harvesting in the fall. Instead what happened was that I almost forgot about them as our yard became a massive construction site as we lifted our home 8 feet higher for flood protection.


The following spring, I noticed new little plants springing up where I planted them but also several on the other side of the driveway. I let them grow and enjoyed the tall plants and bright yellow flowers after the fall equinox. When the frost killed them back to the ground, I pulled up some of the dried stems and found several tubers under each plant, which I was thrilled to try my hand at cooking. We tried roasting them simply in the oven, boiling them with mashed potatoes, adding them to soups, and really enjoyed our new crop - although they never seemed as good as when I was a child eating them for the first time.


A year later, our yard exploded with sunchokes popping up everywhere. I will mention that we love growing all sorts of plants and are in the process of turning our lawns into food forests so we were not concerned about the invasiveness of this plant since it was not just a food source but also a beautiful flower. However, you can keep them under control by simply mowing the young plant, or planting the tubers in large planters and cutting the blooms before they go to seed.


So just how do you plant sunchokes?

Since sunchokes are often harvested in the late fall, you can plant right away, or store them as you do other flower bulbs, in a slightly damp material like sawdust or sand in an unheated garage in the dark. Either way, you want them to stay dormant until spring.

  1. Prepare a hole about 6 inches deep in rich soil with plenty of organic matter and in full sun
  2. Set the tuber in the hole and cover with soil, firming the soil until the hole is filled.
  3. Water the area lightly if the soil is not damp.
  4. Wait for the tuber to grow!
That is really how easy they are. You can plant them in the late fall, or the  middle of winter if you can get a fork in the ground or early in the spring. They are very hardy and don't seem to have many pests, besides maybe some aphids in the early summer.

More info:

According to Wikipedia... "The Jerusalem artichoke, also called sunroot, sunchoke, wild sunflower, topinambur, or earth apple, is a species of sunflower native to central North America. It is cultivated widely across the temperate zone for its tuber, which is used as a root vegetable."

Growing zones 3-8

Source for buying sunchokes, (from my own plants): Etsy, Wildflower Run

Wednesday, September 8, 2021

How to Root Black Elderberry Cuttings

Black Elderberries


Elderberry - one of the fastest growing plants is also very quick to form roots on simple hardwood or softwood cuttings. If you have access to healthy black elderberry plants, you should be able to take a few cuttings (with permission, of course) and within just two years, be harvesting your own black elderberries. 

If you take your own cuttings, cut a six to eight inch section of woody stem and make sure to include at least one leaf node at the top, and one or two others lower down if possible. Place the fresh cuttings directly in water as soon as possible


So, given that you now have some black elderberry cuttings in your hand - what next?


Fresh cut elderberry cuttings


Inspect your cuttings to make sure you know which end is up and which is the bottom. Obviously, if your cutting is upside down, the water uptake won't happen and the cutting will dry out. If you have leaves still attached, orientation is easy. I like to make a slanted cut at the bottom of my cuttings when I remove them from the mother plant. If you inspect the leaf nodes, you will see that the node is wider at the top, tapering down to the stem. The wider side of the node should be facing upward.


Roots forming at the lower leaf node


If you still have a couple of months before winter, place them in a suitably sized container that will allow them to be more than halfway submerged in water. Set in a sunny window and wait. You will need to change the water every few days. Within a week or two you will notice bumps enlarging on the base of the cutting. This is where the roots will form  - a little every day. Once you see the roots stretching out, it's time to plant them out either in their permanent location or in a plant pot. Be very gentle not to disturb the roots as you plant them and then water well. 


Plant elderberries in full sun for best fruit production. They are quite tolerant of poor conditions, but will do best in loamy soil with full sun and plenty of water. Do remember that they will go dormant in the winter and then burst into life in early spring. The first year will be somewhat unimpressive, as the plant will establish a good root system and send up two or three stems. The next year, be ready because they will explode with growth, reaching upwards of ten feet in height and six to twelve arching branches that will each bear nice large umbels of beautiful black elderberries.

Healthy elderberry bush


If you don't have cuttings, you can check out my Etsy site, Wildflower Run.


https://wildflowerrun.etsy.com


Monday, June 14, 2021

How to Root Red Mulberry (Morus Rubra) Tree Cuttings


Summertime is such a fun time for kids when school is finally out. They often have time to think for themselves and be outside exploring this big grand world even if it is from within the scope of their own backyards or maybe a park close by. Half of the United States, from the Mississippi eastward is home to a wonderful fruit tree that almost always grows wild without any care from humans and produces bucket loads of fruit free for children. The red mulberry is the tree I remember finding early in the summer before the blackberries were ripe. They are so much easier to pick as the tree has no thorns. 


Now, I am happy to have a few mulberry trees on my property even if it's only to harvest a few handfuls to eat fresh after I get my mail on summer days. The fruit is soft and sweet and the seeds are barely perceptible when I eat them. I was pleased to find out that this tree will also root from cuttings while it is actively growing, unlike most fruit trees that root from dormant cuttings.


So, how to get these red mulberry tree cuttings to root? There are just a few steps that you can follow and within a few years, you can harvest your own mulberries!


1) Obtain fresh cuttings, preferably with a top leaf. You want to make sure that they cutting is still moist inside so that water can flow from the potting soil into the cutting. If you received them via mail, recut the bottom cut so that you are working with a fresh surface. Immediately place the cutting in water.

2) Prepare a pot by filling it with a well moistened mixture of half coconut coir and vermiculite. (You can also use perlite). Poke a hold in it the same diameter of the cutting about 4 inches deep

3) Dip the freshly cut end of the red mulberry cutting into a rooting hormone preparation

4) Carefully place the cutting into the prepared hole, sinking it down until there is only one node above the soil line

5) Press the soil firmly around the cutting, using your fingers.

6) Water the cutting with room temperature water - preferably non-chlorinated

7) Cover the cutting with a clear cup or bag to keep humidity levels high. 

8) Place the cutting some place warm and with indirect light for four to six weeks or until rooted.

9) Check the cutting every few days by lifting the cover and allowing fresh air in. Make sure the soil stays damp but not wet. 

10) Plant the rooted cutting into a new pot filled with good garden soil. Place outside in a sunny spot and make sure to keep soil damp. In the fall, you can plant your new tiny mulberry tree in permanent location where it will get plenty of sunshine, preferably near other trees but still have room to grow.


That's it. Pretty simple. Although I will say that sometimes the mulberry cuttings can be resistant to rooting. Don't expect more than 50 percent to succeed, unless you have a special touch!

You can check out my Etsy page, Wildflower Run to see if I have any mulberry cuttings in stock.


Full grown mulberry tree